AUTOMOTION
Dust Control Solutions: Cleaner Air, Safer Worksites, Better Results

Ever wondered how much that thin layer of dust on your warehouse floor is costing you? It’s a lot more than you think. All of that dust works its way into machinery, clogs filters, and creates slip hazards. Before you know it, you’re facing unexpected breakdowns and costly repairs.
At www.brisbanesweeping.com.au, we’ve watched businesses cut their maintenance costs considerably just by staying on top of dust control. In this guide, we’ll show you how a good cleaning routine protects your equipment and keeps your workplace safe.
Ready to see how clean floors can increase your profits? Read on to learn more.
Proactive Dust Control vs. Reactive Cleaning
You have two choices regarding your workplace cleaning: plan ahead or catch up. That is to say, you can either control dust before it becomes a problem, or you can wait and deal with the mess later.
Let’s start with the first approach. This proactive procedure will keep your operations running smoothly and your costs manageable. You get more control over everything here.
And the latter approach? It’ll have you constantly dealing with situations that you could have prevented. You’ll feel like nothing is in your hands (except for the panic button, which you’ll spam constantly).
Now, if you’re thinking which approach will save the most of your money in the long run, more details on it are below.
The Predictability of Proactive Control
Regularly cleaning your facilities will drastically increase your productivity. It’s because your team will know when cleaning happens, so they can plan their work around it.
Not only that, a proactive strategy makes your budgeting simple, too. You know upfront what cleaning will cost each month. So there are no surprise expenses or emergency callouts.
Based on our experience, businesses that switch to proactive cleaning reduce their overall maintenance costs by almost half.
The Inefficiency of a Reactive Approach
Next up, the reactive approach. When you wait until dust becomes visible, well, it’s already too late. Your staff has to drop what they’re doing to handle emergency clean-ups. It also leads to your production ceasing immediately.
As if that’s not enough, a reactive approach makes budgeting nearly impossible. How do you plan for costs when you never know when the next cleaning crisis will hit?
Reduce Urgent Repairs with Equipment Maintenance
Machinery takes the hardest hit from dust accumulation, which is why maintenance managers consistently find their biggest savings opportunities here. They understand very well that they can prevent the root cause of mechanical failure before it strikes.
And who doesn’t know, prevention is better than cure (albeit in a different context, but yeah, the idea is the same).
Now, the most urgent repairs start with something as simple as handling dust properly. You’re about to see how it’s the case.

How Dust Leads to Mechanical Failure
Fine particles work their way into every opening, crack, and crevice in your machinery. Once inside, these particles begin a slow but steady destruction process that eventually leads to complete component failure.
But how does it actually happen? Here’s how.
The Impact of Overheating and Abrasion
Your dust buildup acts like a thick blanket over motors and electronics, which traps heat and prevents proper cooling. The whole thing causes the equipment to run hotter than it should. This excessive heat drastically shortens your component’s life.
And while all of that is happening, grit and fine particles keep contaminating your lubricants. It leads to oil becoming an abrasive paste that wears down bearings, gears, and other moving parts.
The Breakdown of an Urgent Repair
Picture a typical scenario: an important machine fails suddenly due to component burnout or seizure. Well, at this point, you know that dust accumulation caused this failure. Except, you won’t figure out the cause until after the entire production line stops without warning.
So, the takeaway here is that emergency repairs increase costs, force you to rush the parts ordering process, and cost you revenue.
Switching to Planned Non-Urgent Repairs
When you have facilities with proper dust control in place, you see a different story. In these facilities, technicians performing routine equipment maintenance can easily spot early signs of wear or leaks.
Do you know what it means for your maintenance teams? They can schedule low-cost repairs during planned downtime instead of dealing with expensive emergencies.
Increased productivity all around.
Calculating Your Cleaning ROI for Reduced Costs
Cleaning ROI measures how much money you save by investing in regular sweeping services. And with it, you can prove it’s actually a money-saving investment instead of a useless expense. You can easily see the value of regular cleaning with a simple Return on Investment formula.
The math is plain and simple once you know what to measure. Keep reading to know the variables for this cleaning ROI calculation.
The Variables in Your ROI Formula
You only need to assign a value to your operational costs to see the financial benefit of your professional cleaning. So, take a step back and think about your facility’s specific numbers for these factors:
Main Cost Variables
- Revenue lost per hour of operational downtime: Calculate how much money your facility loses when production stops. Also, don’t forget to include lost sales, idle labour costs, and missed delivery deadlines that can damage customer relationships.
- Total emergency breakdown costs: You need to add up both labour and parts for an average urgent repair. Emergency callouts typically cost 2-3 times more than planned maintenance, plus you’ll pay premium rates for rush parts orders.
- Premature parts replacement budget: When you spend money on replacing components that failed earlier than expected, ensure that you keep track of it.
- Safety and environmental breach penalties: It’s important to research the potential fines for workplace accidents or environmental violations in your area. These penalties can range from thousands to tens of thousands of dollars.
Quantifying the Value of Reduced Repairs
A closer look at these costs alongside the set price of a regular sweeping service gives you the full picture of the financial benefits.
In our experience, most facilities achieve a 3:1 return on their cleaning investment during the first year alone. It’s because prevention not only delivers great savings but also helps keep repair costs predictable and manageable.
Your Next Step to Better Profit Margins
We know dust can drain thousands from your maintenance budget through equipment failures and emergency repairs. But here’s good news for you: professional sweeping services can completely remove these hidden costs and give you the opportunity to make predictable savings.
In this article, we’ve explored how proactive cleaning beats reactive responses and protects machinery from costly breakdowns. You’ve also learned about compliance standards and how to measure ROI through reduced repair costs.
Brisbane Sweeping Service offers 24/7 industrial cleaning across Brisbane, the Gold Coast, and the Sunshine Coast. Contact us today for your obligation-free quote and to inspect your savings potential.
Introduction
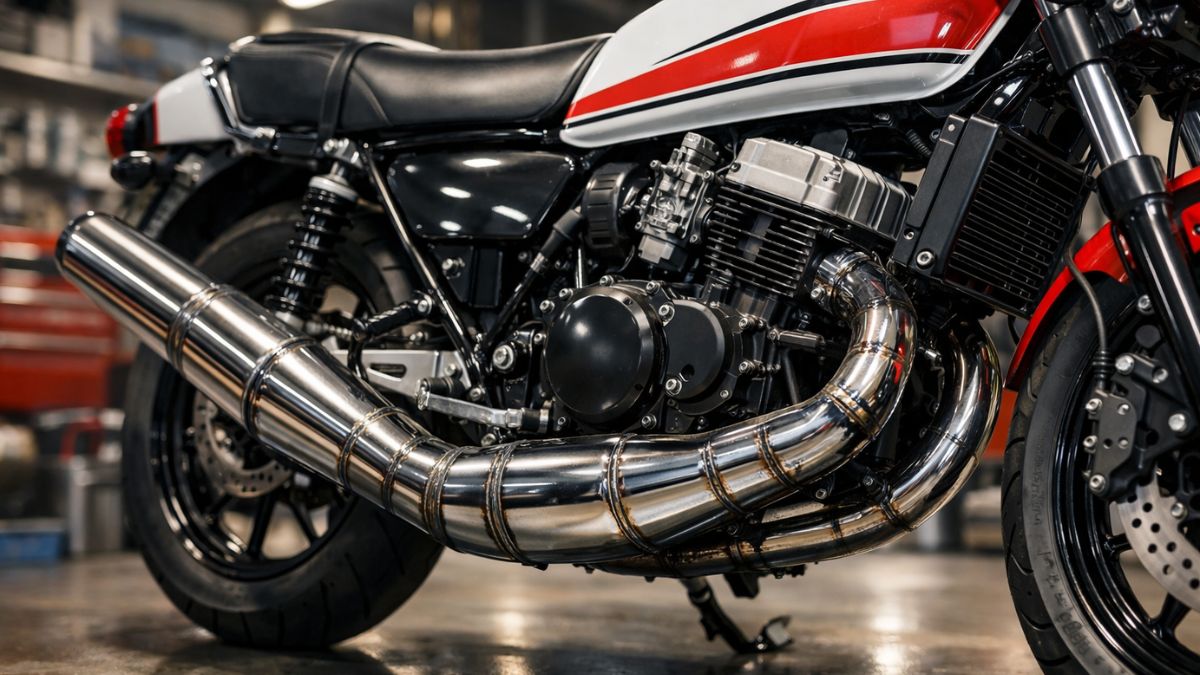
For motorcycle enthusiasts who love classic two-stroke machines, the escapamento RD is more than just an exhaust pipe. It plays a major role in how the bike performs, sounds, and even looks. Riders who own Yamaha RD motorcycles often upgrade the exhaust system to unlock more power and improve throttle response.
The right exhaust system can dramatically change the riding experience. A well-designed performance exhaust helps optimize airflow, increase horsepower, and enhance the distinctive sound that two-stroke motorcycles are famous for.
In this guide, you’ll learn everything about RD exhaust systems, including how they work, the different types available, performance benefits, installation tips, and common mistakes riders should avoid.
What Is an RD Exhaust System?
An RD exhaust system refers to the performance exhaust designed for Yamaha RD series motorcycles, which include iconic models like RD125, RD250, RD350, and RD400.
Two-stroke engines rely heavily on exhaust design to control airflow and combustion efficiency. Unlike four-stroke bikes, the exhaust system in a two-stroke engine directly affects power delivery.
Key Functions of an RD Exhaust
-
Improves engine breathing
-
Increases horsepower and torque
-
Enhances throttle response
-
Produces the classic two-stroke sound
-
Improves engine efficiency
The most recognizable feature of an RD exhaust is the expansion chamber, which is carefully shaped to maximize engine performance.
Souvite Cooking Guide: How Precision Water Bath Cooking Creates Perfect Meals
How Two-Stroke Exhaust Systems Work
Two-stroke engines operate differently from four-stroke engines. Instead of using separate intake and exhaust strokes, both processes happen almost simultaneously.
Because of this design, the exhaust system plays a crucial role in managing engine airflow.
The Role of the Expansion Chamber
An expansion chamber is the most important part of a performance RD exhaust.
It works by:
-
Allowing exhaust gases to expand rapidly
-
Creating pressure waves inside the chamber
-
Pushing unburned fuel back into the cylinder
-
Increasing combustion efficiency
This process significantly boosts engine power.
Why Exhaust Shape Matters
The exact shape and length of the expansion chamber determine the engine’s power band.
A well-tuned exhaust can:
-
Increase peak horsepower
-
Improve mid-range power
-
Enhance acceleration
That’s why RD riders often invest in performance exhaust upgrades.
Types of RD Exhaust Systems
Different riders choose different exhaust styles depending on their performance goals.
Common RD Exhaust Types
| RD Exhaust Type | Performance Level | Best For | Sound Profile |
|---|---|---|---|
| Stock RD Exhaust | Standard | Daily riding | Moderate |
| Expansion Chamber Exhaust | High | Performance tuning | Aggressive |
| Racing Exhaust | Very High | Track use | Very loud |
| Custom Performance Exhaust | Variable | Custom builds | Unique |
1. Stock Exhaust
Stock exhaust systems are designed for reliability and balanced performance.
Advantages include:
-
Quiet operation
-
Good fuel economy
-
Long durability
However, they often restrict performance.
2. Expansion Chamber Exhaust
This is the most popular upgrade for RD motorcycles.
Benefits include:
-
Improved power output
-
Faster throttle response
-
Iconic two-stroke sound
Many RD enthusiasts consider this the best upgrade for performance.
3. Racing Exhaust
Racing exhaust systems are built specifically for track use.
They are:
-
Extremely lightweight
-
Designed for maximum power
-
Often louder than standard systems
However, they may not be ideal for everyday riding.
4. Custom Exhaust Systems
Custom exhaust builds allow riders to tune their bikes exactly the way they want.
These systems often feature:
-
Hand-welded pipes
-
Custom expansion chambers
-
Unique sound profiles
Performance Benefits of Upgrading an RD Exhaust
Upgrading the exhaust system is one of the most effective performance modifications for RD motorcycles.
Key Performance Gains
| Performance Factor | Stock Exhaust | Performance RD Exhaust |
|---|---|---|
| Horsepower | Standard | Increased |
| Acceleration | Moderate | Faster |
| Throttle Response | Normal | Sharper |
| Engine Efficiency | Basic | Improved |
Improved Engine Power
A well-designed expansion chamber allows the engine to burn fuel more efficiently, which leads to higher power output.
Better Acceleration
Performance exhaust systems improve the bike’s power band, allowing faster acceleration.
Reduced Weight
Many aftermarket exhaust systems are lighter than stock exhausts, which improves overall bike performance.
Enhanced Sound
Two-stroke motorcycles are known for their distinctive exhaust note. A performance exhaust enhances this sound while improving engine response.
How to Choose the Best RD Exhaust
Choosing the right exhaust depends on several factors.
Factors to Consider
| Selection Factor | Why It Matters | Recommendation |
|---|---|---|
| Motorcycle Model | Different RD models require different exhaust sizes | Check compatibility |
| Riding Style | Daily riding vs racing | Choose accordingly |
| Material | Affects durability and weight | Stainless steel preferred |
| Noise Level | Important for street legality | Moderate exhausts for street use |
Match the Exhaust to Your Bike
Always choose an exhaust designed specifically for your RD model.
Common compatible models include:
-
RD125
-
RD250
-
RD350
-
RD400
Consider Your Riding Style
If you mostly ride on public roads, a balanced performance exhaust is the best choice.
For racing or performance builds, a full expansion chamber system may be ideal.
Installation Guide for RD Exhaust Systems
Installing a new exhaust system is relatively straightforward if you have basic mechanical skills.
Basic Installation Steps
-
Allow the engine to cool completely
-
Remove the old exhaust system
-
Inspect mounting brackets and gaskets
-
Install the new exhaust pipe
-
Secure all bolts tightly
-
Test the engine and check for leaks
Tools You May Need
-
Socket wrench set
-
Screwdrivers
-
Exhaust gasket kit
-
Protective gloves
Professional installation is recommended if you are not comfortable working on motorcycle engines.
Pros and Cons of RD Exhaust Upgrades
Pros
-
Increased engine performance
-
Improved throttle response
-
Classic two-stroke sound
-
Lightweight design
-
Better riding experience
Cons
-
Can increase noise levels
-
May require carburetor tuning
-
Higher cost for premium systems
-
Some racing exhausts are not street legal
Common Mistakes Riders Make
Many riders install performance exhaust systems without considering the full tuning process.
Mistakes to Avoid
1. Ignoring Carburetor Tuning
After installing a new exhaust, carburetor adjustments may be necessary to maintain the correct fuel-air mixture.
2. Buying Low-Quality Exhaust Systems
Cheap exhaust systems often reduce performance instead of improving it.
3. Incorrect Installation
Improper mounting can cause exhaust leaks and performance issues.
4. Ignoring Compatibility
Always ensure the exhaust fits your specific RD model.
Best Practices for RD Exhaust Performance
To get the most out of your exhaust upgrade, follow these expert tips.
Maintain Proper Engine Tuning
A performance exhaust works best when combined with:
-
Proper carburetor jetting
-
High-quality fuel
-
Regular engine maintenance
Use Quality Components
Choose exhaust systems from reputable manufacturers known for RD performance parts.
Inspect the Exhaust Regularly
Check for:
-
Loose bolts
-
Exhaust leaks
-
Rust or corrosion
Regular maintenance ensures long-term performance.
Conclusion
The escapamento RD is one of the most important upgrades for riders who want to unlock the true potential of their Yamaha RD motorcycle. Because two-stroke engines rely heavily on exhaust design, choosing the right system can dramatically improve performance, acceleration, and overall riding experience.
From classic expansion chambers to racing exhaust systems, there are many options available depending on your goals. By selecting the right exhaust, installing it correctly, and tuning your engine properly, you can transform your RD motorcycle into a powerful and responsive machine.
For motorcycle enthusiasts who love performance and classic two-stroke sound, upgrading the RD exhaust is one of the best modifications you can make.
FAQs
What is an escapamento RD?
An escapamento RD is a performance exhaust system designed for Yamaha RD motorcycles. It improves engine power, airflow, and throttle response.
Does upgrading an RD exhaust increase horsepower?
Yes. A performance expansion chamber exhaust can significantly increase horsepower by improving engine airflow and combustion efficiency.
Is an expansion chamber necessary for RD motorcycles?
While not mandatory, expansion chamber exhausts are widely used because they maximize two-stroke engine performance.
Do I need carburetor tuning after installing a new RD exhaust?
In many cases, yes. Performance exhaust systems may require carburetor adjustments to maintain the proper air-fuel mixture.
Are racing RD exhaust systems street legal?
Some racing exhaust systems are not street legal due to high noise levels. Always check local regulations before installation.
Introduction to Changing a Tire
Getting a flat tire can feel like the end of the world, especially if you’re stuck on the side of the road. But don’t panic—learning how to change a tire is easier than you might think. With just a few basic steps and some essential tools, you can tackle this task confidently and get back on your way in no time. Whether you’re heading out for an adventure or commuting to work, knowing how to change a tire is an invaluable skill that every driver should possess. Let’s embark on this journey together and make sure you’re prepared for any roadside mishap!
Necessary Tools and Equipment
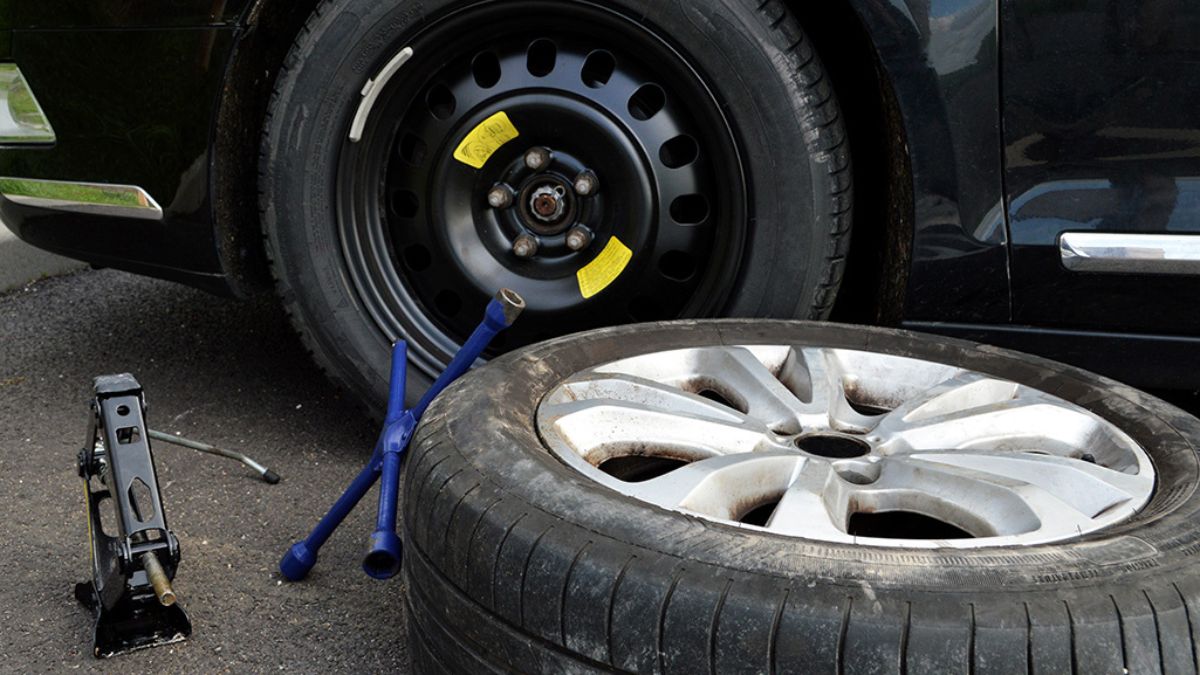
To change a tire successfully, you need the right tools. Start with a spare tire that’s properly inflated. It’s crucial to check this before any emergency strikes.
A lug wrench is essential for loosening and tightening the lug nuts. Make sure it fits your vehicle’s nuts snugly to avoid stripping them.
You’ll also require a hydraulic jack or scissor jack to lift your car safely off the ground. Ensure it’s rated for your vehicle’s weight.
Don’t forget gloves! They protect your hands from dirt and sharp edges while providing better grip on tools.
Having reflective triangles or flares can enhance safety if you’re stuck in traffic. These items alert other drivers of your situation, giving you peace of mind as you work on changing that tire.
Essential Tire Changing Tools Overview
| Tool | Purpose | Why It Matters |
|---|---|---|
| Spare Tire | Replacement for the flat tire | Allows you to continue driving safely |
| Lug Wrench | Loosens and tightens lug nuts | Essential for removing the damaged tire |
| Car Jack | Lifts the vehicle | Provides access to remove the tire |
| Gloves | Protects hands | Improves grip and safety |
| Reflective Triangles/Flares | Alerts other drivers | Increases roadside safety |
Being familiar with these tools makes learning how to change a tire much easier when an emergency occurs.
Safety Precautions
Changing a tire can be straightforward, but safety should always come first. Before you start, ensure you’re parked on a flat and stable surface. Avoid any slopes that could cause the vehicle to roll.
Wear gloves if possible. This adds a layer of protection against sharp edges or hot surfaces while handling the tire.
If it’s dark or visibility is poor, use a flashlight or hazard lights to make yourself more visible to passing vehicles.
Also, keep your emergency brake engaged at all times during the process. This helps prevent accidental movement of the car when you’re working underneath it.
Stay clear from under the vehicle unless it’s securely supported by jack stands. Your safety is paramount as you tackle this important task!
Step by Step Guide to Changing a Tire
Understanding how to change a tire step by step makes the process far less intimidating.
Changing a tire might seem daunting, but breaking it down into steps makes it manageable. Start by loosening the lug nuts while the tire is still on the ground. This prevents the wheel from spinning as you apply force.
Next, use a jack to lift your car off the ground. Ensure you’re on stable ground and follow your vehicle’s manual for proper jacking points.
Once elevated, remove those loosened lug nuts completely and take off the flat tire. Be careful—sometimes they can be stuck after prolonged use.
Now it’s time for your spare tire! Align it with the wheel hub and hand-tighten those lug nuts to secure it in place before lowering your car back down.
Once grounded again, fully tighten each lug nut in a crisscross pattern to ensure stability. It’s simple when you break it down!
Quick Overview of Tire Changing Steps
| Step | Action | Key Tip |
|---|---|---|
| 1 | Loosen lug nuts | Do this before lifting the car |
| 2 | Jack up the vehicle | Use proper jack points |
| 3 | Remove flat tire | Keep lug nuts in a safe place |
| 4 | Install spare tire | Align wheel bolts carefully |
| 5 | Tighten lug nuts | Use a star pattern for balance |
A. Loosening the Lug Nuts
Before you lift the car, it’s essential to loosen the lug nuts. This step saves you from a wobbly situation later on.
Using a lug wrench, apply firm pressure in a counterclockwise direction. If they’re too tight, try standing on the wrench for extra leverage. The right technique makes all the difference.
Don’t forget to break them loose slightly before jacking up your vehicle. Doing so while the tire is still grounded provides stability and prevents spinning.
Loosening each nut about a quarter turn will help ensure they come off easily once you’re ready to replace that flat tire.
Pay attention to any rust or debris around the nuts; it can complicate things further down the line. A little effort now means fewer headaches when changing tires becomes necessary later on.
B. Jacking Up the Car
Once you’ve loosened the lug nuts, it’s time to jack up the car. Locate your vehicle’s jacking point. This area is usually reinforced and can handle the weight.
Position your jack directly beneath this point. Make sure it’s stable before you start lifting. A firm surface under the jack will help prevent slipping or tipping.
Crank or pump the jack until the tire is off the ground. Keep an eye on both sides of your vehicle for stability as it rises.
It’s crucial to lift high enough so that there’s ample space to remove and replace tires easily. Never crawl underneath a car supported only by a jack; always use jack stands for safety once elevated.
With everything in place, you’re ready to move onto removing that flat tire!
C. Removing the Flat Tire
With the car securely lifted, it’s time to tackle that flat tire. Start by gripping the tire firmly with both hands. A little muscle may be required here.
Tilt it slightly toward you and pull it straight off the wheel hub. You might need to wiggle it a bit if it’s stuck, but don’t apply too much force or risk damaging anything else.
As you remove the tire, take a moment to inspect the brake components and surrounding area for any signs of wear or damage. This is also an excellent opportunity to check your spare’s condition before installation.
Set aside the flat tire in a safe spot where it won’t roll away or become an obstacle. Keep things organized; this will make your next steps smoother as you prepare for putting on that spare.
D. Putting on the Spare Tire
Once the flat tire is off, it’s time to put on the spare. Grab your spare tire and align it with the wheel hub. Make sure that any holes in the rim match up with the bolts sticking out.
Carefully slide the tire onto these bolts until it’s securely seated against the hub. Don’t rush this step; a proper fit ensures safety when you’re back on the road.
Next, take your lug nuts and hand-tighten them onto each bolt. It’s crucial to start with one nut and move diagonally across to ensure even pressure as you tighten each one.
Once they are all snug, use your wrench to fully tighten them in a star pattern. This method prevents wobbling and keeps everything balanced during your drive after changing tires.
Tips and Tricks
When changing a tire, having the right strategy can make all the difference. Keep your spare tire inflated and check its pressure regularly. An under-inflated spare won’t get you far.
Use gloves to maintain grip on tools while protecting your hands from dirt and sharp edges. They also keep you comfortable during the task.
If you’re in a pinch, place rocks or wooden blocks behind wheels for added stability when jacking up the car. This helps prevent rolling.
Before starting, familiarize yourself with your vehicle’s jack points as indicated in your owner’s manual. Knowing where to lift will ensure safety and efficiency.
Always remember to recheck lug nut tightness after driving a short distance on your new tire. It’s an easy step that could save you headaches later down the road.
Common Mistakes to Avoid
Changing a tire can be straightforward, but many beginners trip over common pitfalls.
One frequent mistake is not loosening the lug nuts before lifting the vehicle. This makes it nearly impossible to unscrew them once the car is elevated. Always loosen those nuts while the tire remains on the ground for better leverage.
Another error involves using an unstable jack or failing to secure it properly. A wobbly jack can lead to accidents, so ensure you’re on stable ground and follow your owner’s manual for proper placement.
Forgetting to check the spare tire’s condition beforehand is also problematic. If it’s flat or damaged when you need it most, you’ll find yourself in a bind.
Neglecting safety gear like gloves and reflective vests can put you at risk during roadside repairs. Protect yourself from dirt and traffic hazards by being prepared with basic safety equipment.
Most Common Tire Changing Errors
| Mistake | Risk | How to Avoid It |
|---|---|---|
| Not loosening lug nuts first | Nuts may become impossible to remove | Loosen while tire is on the ground |
| Jack placed incorrectly | Vehicle may slip or fall | Use manufacturer jack points |
| Ignoring spare tire condition | Spare may also be unusable | Check pressure regularly |
| Improper lug nut tightening | Wheel wobbling or detachment | Tighten in a crisscross pattern |
Importance of Knowing How to Change a Tire
Knowing how to change a tire is an essential skill for every driver. Flat tires can happen unexpectedly, leaving you stranded and frustrated. Being able to handle this situation empowers you.
Imagine being on a long road trip or commuting to work when your tire goes flat. Having the ability to change it yourself not only saves time but also spares you from waiting for roadside assistance.
Additionally, understanding the process builds confidence in your driving abilities. You become more self-reliant and less dependent on others during emergencies.
Moreover, knowing how to handle basic car maintenance can lead to greater awareness of vehicle health. Regularly checking tire conditions helps prevent flats before they occur.
This practical knowledge enhances safety for both you and fellow drivers on the road. In uncertain situations, having this competence could make all the difference in keeping calm under pressure.
Conclusion
Changing a tire is an essential skill that every driver should have. It empowers you to handle unexpected situations on the road confidently. With the right tools and knowledge, you can save time, money, and stress.
Remember to always prioritize safety by ensuring your vehicle is stable before starting any work. Practice these steps in a safe environment if you’re new to it—becoming familiar with the process will make it easier when you actually need to change a tire.
Keep this guide handy as a reference. Knowing how to change a tire not only enhances your driving independence but also prepares you for those unforeseen circumstances that may arise while traveling. Drive safely!
FAQ: How to Change a Tire
1. How long does it take to change a tire?
For beginners, learning how to change a tire usually takes about 20–30 minutes. With practice, many drivers can complete the process in under 15 minutes.
2. Can I drive long distances on a spare tire?
Most spare tires are temporary and designed for short distances—typically around 50–70 miles at reduced speed. Replace it with a regular tire as soon as possible.
3. Do all cars come with a spare tire?
Not all modern vehicles include a spare tire. Some come with tire repair kits instead, so it’s important to check your car’s equipment.
4. What should I do if the lug nuts are stuck?
If lug nuts are stuck, try applying extra leverage with your lug wrench or carefully using body weight. Penetrating oil can also help loosen rusted nuts.
5. Is it safe to change a tire on the highway?
If possible, move the vehicle to a safe shoulder or nearby parking area before attempting to change a tire. Always use hazard lights and reflective markers.

Purchasing a vehicle is a significant milestone, and choosing the right dealership can have a lasting impact on your entire ownership experience. Ford dealerships stand out by offering a robust blend of services that go far beyond the initial sale. From extensive model inventories and tailored financing to after-sales support and cutting-edge technology integrations, customers receive a streamlined and supportive journey from start to finish. Learn More about how a full-service dealership can enhance every stage of car ownership.
Comprehensive dealer services include a diverse selection of new and pre-owned vehicles, competitive financing options, and proactive vehicle maintenance programs that provide peace of mind. By centralizing these offerings, Ford dealerships are built to save customers time and simplify key decisions as they navigate both daily commutes and life’s bigger transitions.
Vehicle Sales
Ford dealerships offer an extensive selection of vehicles to suit every lifestyle and need. Whether you’re searching for the practical efficiency of a Ford Escape, the adventurous capability of the Bronco, or the toughness of an F-Series truck, you will find model options equipped with innovative safety and connectivity features. Sales representatives guide customers through the entire purchasing process, providing model comparisons, test drives, and expert recommendations to help buyers make informed decisions.
Additionally, many Ford dealerships feature certified pre-owned (CPO) vehicles. These cars undergo a rigorous inspection and reconditioning process to meet manufacturer standards, offering buyers enhanced peace of mind. CPO benefits often include limited warranties, roadside assistance, and transparent vehicle history reports.
Financing Options
Financing is a crucial consideration for most car buyers, and Ford dealerships present a range of solutions to accommodate various financial situations. Options typically include traditional auto loans with customizable terms, flexible leasing plans, and special programs for first-time buyers or those with less-than-perfect credit. Ford Credit, the manufacturer’s financing arm, supports both individual and commercial buyers with transparent, straightforward terms and minimal fees. For companies, commercial installment options provide the flexibility required to keep operations running smoothly and efficiently. You can find more detailed information on commercial vehicle financing through Ford’s official financing site.
Maintenance Services
Routine maintenance is essential for vehicle longevity and reliability. Ford dealerships employ factory-trained technicians equipped with the latest diagnostic tools to provide high-quality service. Whether it is scheduling regular oil changes, handling complex engine repairs, or rotating tires, these professionals use genuine Ford parts to preserve performance and factory warranties.
Dealerships often offer bundled service plans, prepaid maintenance packages, and seasonal specials. These convenience-focused offerings allow owners to budget more effectively for routine care and to maximize their vehicle investment over time. According to Consumer Reports, staying up to date with maintenance schedules can significantly reduce unexpected breakdowns and repair costs.
Mobile Service Solutions
Recognizing the value of customer convenience, some Ford dealerships have introduced mobile service solutions. With these programs, certified technicians can visit a client’s home or workplace to perform basic maintenance or repairs. This service is beneficial for busy professionals, families, and business fleet managers who need to minimize vehicle downtime. Dealerships like Evansville Ford have gained attention for their mobile service offerings, providing flexible care options that adapt to customers’ schedules without compromising quality. Read more about Evansville Ford’s mobile service programs for detailed insights.
Commercial Services
For business owners and fleet operators, Ford dealerships introduce specialized solutions designed to ensure seamless operations. Through Ford Pro, dealers support commercial customers with tailored fleet management plans, maintenance prioritization, and streamlined financing opportunities. These services can be scaled for small businesses and large corporate fleets, delivering value through reliability and efficiency. More companies are turning to professional dealership partnerships to manage the complexities of commercial vehicle maintenance and minimize service interruptions. Dealer programs may also include bulk purchasing discounts and customizable maintenance contracts. Explore Ford Pro’s fleet solutions for a detailed look at options for medium and large fleets.
Technological Advancements
Ford dealerships continue to evolve by integrating the latest in digital technology and online tools. Platforms like FordDirect’s “The Shop” provide a one-stop e-commerce resource for dealers, enabling the rapid sourcing of vetted vendors and negotiation on essential products and services. This digital transformation not only streamlines dealer operations but also translates to a more seamless consumer experience. Customers benefit from quicker service, more transparent pricing, and updated digital interfaces when managing appointments or browsing inventory online. You can read more about FordDirect’s platform and its impact on the dealership experience.
Customer Support
Customer service remains at the heart of every Ford dealership interaction. Dedicated support teams assist with a broad array of needs, from guiding buyers through loan applications to helping owners customize their new vehicles. Post-sale, dealerships remain available to resolve questions regarding warranties, maintenance scheduling, and technology updates. Personalized follow-up and satisfaction surveys are standard practices that help ensure every owner enjoys an outstanding experience long after their purchase.
Conclusion
Choosing a comprehensive Ford dealership means more than just a new set of keys. It represents a commitment to quality at every touchpoint, from the showroom through regular maintenance and ongoing customer support. With a focus on transparency, convenience, and lasting value, Ford dealerships are equipped to meet the evolving needs of today’s vehicle shoppers and owners. Whether you are buying for personal use or managing a business fleet, leveraging dealership resources can deliver long-term peace of mind and satisfaction throughout your vehicle’s lifespan.
-

 TOPIC1 year ago
7 Expert Tips For Choosing The Best Basement Renovation Companies
-

 TOPIC1 year ago
Why Large Waterproof Outdoor Rugs Are Essential for All Outdoor Spaces
-

 TOPIC9 months ago
Why Greece Katz Martian Has Everyone Talking in 2025
-

 FASHION1 year ago
How to Layer Your White Dress for Cold Weather?
-

 BUSINESS10 months ago
Top 5 Features of Sowix Online That Every User Should Know About
-

 TOPIC10 months ago
Top Features of BetterThisWorld .com You Need to Know About
-

 FINANCE1 year ago
How TraceLoans Can Simplify Your Finances
-

 BIOGRAPHY1 year ago
From Reality Star to Business Mogul: Prince Narula Digital PayPal