HOME IMPROVEMENT
How Can You Add Vintage Charm to Your Modern TV Stand?
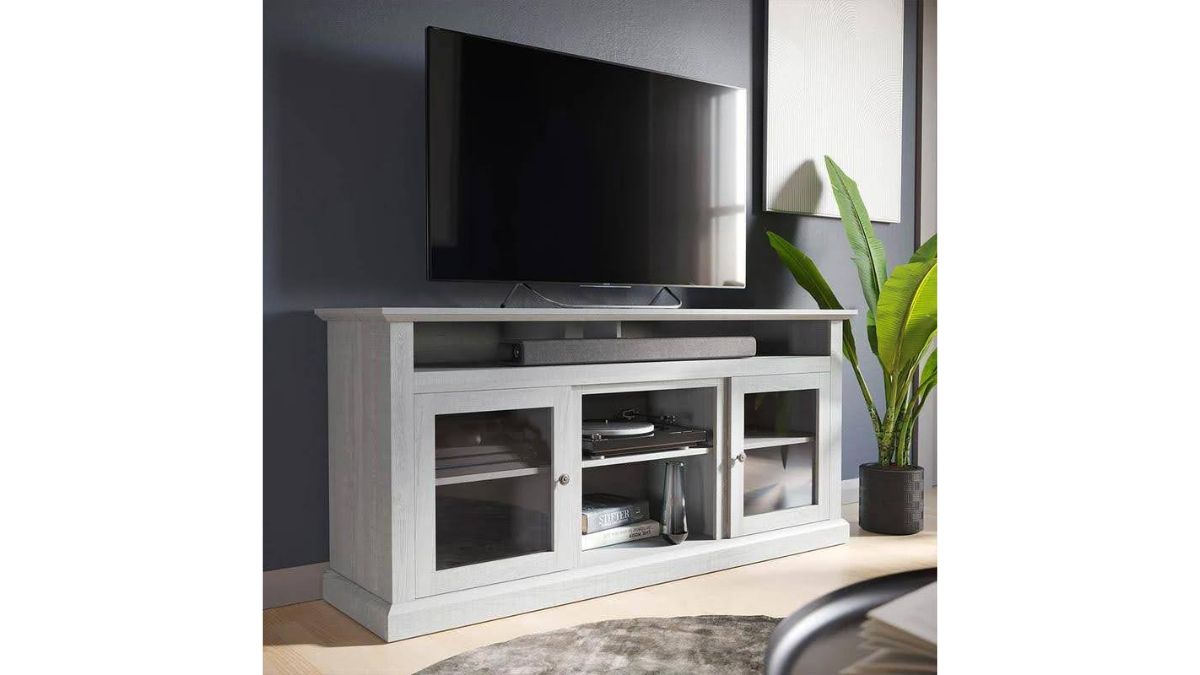
Many old elements remind us of the good old days. Using them in a modern home not only makes it different but also tells a lot about the owner’s taste and personality. Today, let’s explore how to decorate a modern TV stand with vintage elements to give your living room a different flavor.
Use vintage accessories
Vintage accessories add a touch of history to modern TV stands. Place some classic old pieces on the cabinet, like an antique table lamp, a beautiful bronze sculpture, or a few old books. These accessories bear the marks of time and can instantly give space warmth and depth.
Above the TV stand, one can also hang a painting or mirror with vintage charm. A vintage painting can be made as the focal point of your living room, while a mirror with a classic floral motif can bring in old-world elegance.
And don’t forget small nostalgic objects such as old clocks, vintage cameras, or gramophones. All these details may maybe unassuming but can quietly create a warm vintage atmosphere in space.
Magic of materials
Most modern TV stands are simple in design and have a smooth surface; adding a few different textures can make the space feel more sophisticated. Placing a handmade ceramic vase or setting up a soft woven cushion instantly warms up the room.
You can also decorate the cabinet tops with vintage-style wood decals to add a vintage touch and protect the TV stand from scratches. Another small detail is to replace the handles of your TV stand, choose handles made of metal or wood, they will oxidize over time and give a unique vintage charm.
Putting an old-time style rug around the TV stand or a few small cushions with vintage patterns will neutralize the coldness of modern furniture and make the whole space more approachable.
Magic of light
Lamps with a vintage vibe also will help provide your area with not only some real unique visual charm but also create a warm light effect. Consider an iron or copper chandelier featuring a rather rugged design for the light emitting that develops a time-worn look with a modern TV stand. If you want something softer, use the wall sconces, also from the vintage line.
Place one or two small metal candlesticks or old oil lamps above the TV stand, and when lit, the soft candlelight makes the whole room look more romantic and intimate, as if time has gone back to the old days.
Another interesting combination is the modern and vintage lamps clever combination. You can install a modern and minimalist chandelier above the TV stand and then place vintage table lamps on both sides of the cabinet; the contrast will make your space even more striking.
The time machine of colors
Go for warm tones of dark grey, olive green, or burgundy colors that create a vintage atmosphere in just one moment. You’ll achieve this effect by renovating the wallpaper on the back wall of your contemporary TV stand, choosing some classic geometric patterns or vintage textures as if moving into the past.
For example, try putting a classic checkered wallpaper on the back wall with a few old black and white photos and vintage advertising posters, and the sense of time will immediately emerge. If you don’t want to rearrange the wallpaper, you can choose some small objects with old wood or bronze textures, which can also bring a nostalgic atmosphere.
Balance of function and aesthetics
While pursuing vintage aesthetics, one can’t just forget the functionality of TV stands. Modern TV stands provide ample storage for displaying loved vintage collectibles. Place a couple of old cameras or a set of handmade pottery on the open shelves to let the nostalgia naturally flow.
One of these can be a classic iron bookshelf beside the television stand on which old movie footage, or classic literature for that matter, can be kept on show to give the entire room more sense of coherence. Linen or wooden crate-style organizers of smaller items like remote controls or gamepads are available to keep things tidy.
Matching tips
For an intense feeling of vintage, it has to be matched with furniture in its style, for example, a vintage fabric sofa or rattan chairs. Put a dark oak coffee table in front of the TV stand with several old books and ceramic vases on it to give off a strong feeling of age. Combine this with dark-tone curtains or printed drapes to add more fullness and charm to the whole space.
Conclusion
Decorating a modern TV stand and incorporating classic elements is an artistic balancing act. We wanted to show the sharpness and practicality of modern furniture while incorporating the warmth and sense of memory of vintage style. By skillfully matching the decor with these inspirations, your TV stand will not only carry the modern flavor of your home but also tell the story belonging to it and add a unique flavor to the space.
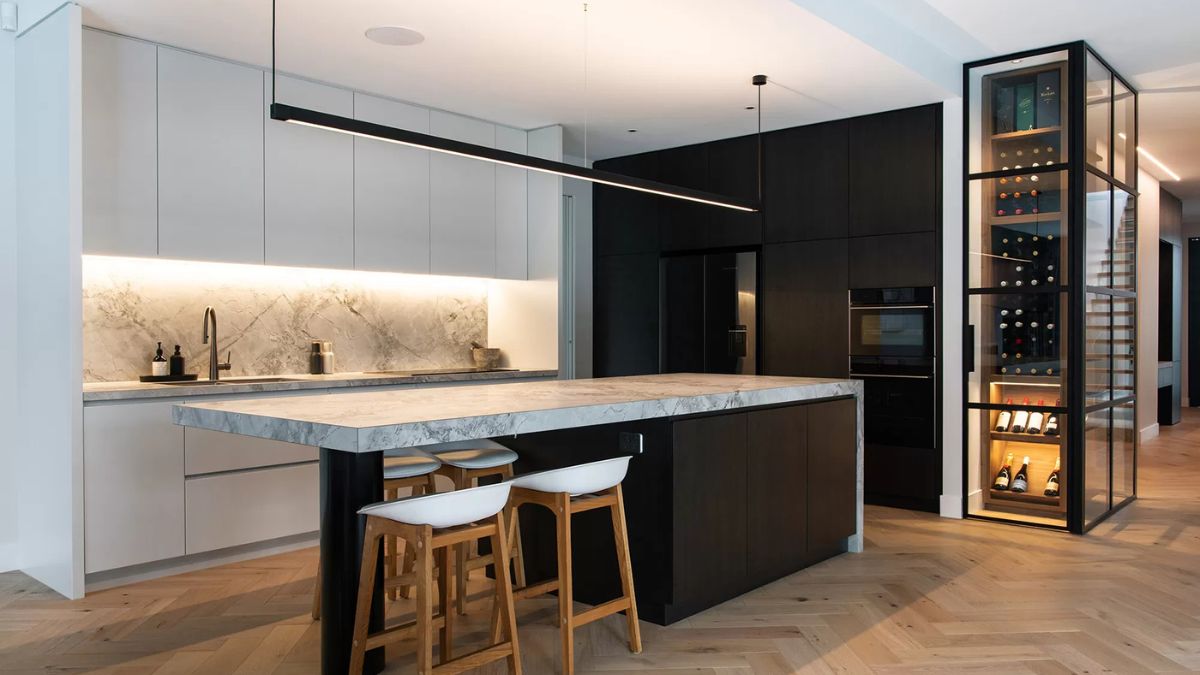
What Is an Eco-Friendly Kitchen?
An eco-friendly kitchen remodel means more than just upgrading appliances; it’s about consciously minimizing environmental impact with every choice, from design to execution and long-term maintenance. The heart of sustainable kitchen design is considering how materials are sourced, how much energy and water are used, and how daily living can be improved by reducing waste and pollution. Kitchens consume a significant share of a home’s resources, making them an ideal candidate for sustainable upgrades. Whether you’re dreaming up ideas or searching for a kitchen remodel near me to connect with specialists who understand the challenges and opportunities of green renovations, every step counts toward a healthier space and planet. The momentum behind eco-friendly remodels continues to build, with more homeowners focusing on what looks good in the short term and what creates more nutritious, energy-efficient spaces for families and future generations. The focus has shifted from trendy upgrades to purposeful decisions about sourcing, disposal, and long-term impact, ensuring kitchens are beautiful, functional, and responsible.
Sustainable Materials for Cabinetry and Countertops
Cabinetry, countertops, and flooring lay the foundation for every kitchen. Selecting eco-friendly materials is one of the most potent ways to reduce your renovation’s footprint. Materials like recycled glass countertops provide a sleek, contemporary look and divert waste from landfills, giving old glass bottles and discarded materials new life. Bamboo, a powerful yet fast-growing renewable resource, is a favorite for modern kitchen cabinetry since it matures in only a few years and is harvested without destroying root systems, allowing regrowth. For those seeking character and a story, reclaimed wood salvaged from barns or historic buildings brings warmth and authenticity into the home while lowering demand for new lumber. These choices are not just personal preferences but reflect broader environmental priorities. The EPA’s sustainable management guidance recommends salvaging and using reclaimed or local materials as a best practice. It reduces the need for new resources and helps keep building materials active rather than contributing to construction waste. Opting for low- or zero-VOC (volatile organic compound) paints, stains, and sealants ensures you’re making greener choices and protecting your indoor air quality throughout the remodeling process.
- Bamboo: A top choice for cabinets and flooring—renewable and strong.
- Recycled Glass: Durable, unique, and eco-conscious for counters and backsplashes.
- Reclaimed Wood: Brings unique character and reduces deforestation.
- Low-VOC Products: Achieve style while keeping the air clean and safe.
Energy-Efficient Appliances and Lighting
One of the most visible areas of progress in sustainable kitchen design is appliance and lighting efficiency. ENERGY STAR-certified appliances have become the gold standard, as these models use up to 50% less energy and water than older versions. This directly saves homeowners on utility bills while contributing to a more sustainable household. Smart refrigerators, induction cooktops, and advanced dishwashers aren’t just tech upgrades—they’re investments in long-term efficiency. Modern lighting solutions, such as LEDs and compact fluorescents (CFLs), drastically reduce electricity consumption and have the bonus of lasting years longer than incandescent bulbs. Embracing dimmers, motion sensors, and programmable lighting transforms how you interact with your kitchen, allowing you to use energy only as needed during different times of day or night. These upgrades might seem small, but they can lower your kitchen’s energy usage yearly.
- Prioritize ENERGY STAR-rated fridges, dishwashers, and stoves to cut consumption.
- Install efficient LEDs throughout – ideal for under-cabinet, accent, and ceiling lighting.
- Consider motion sensors and smart controls for automatic shutoff.
Water-Saving Fixtures and Best Practices
Kitchens are among the highest water-using areas in any home, particularly as families grow and cooking at home becomes more frequent. Upgrading to a low-flow, aerated faucet can reduce water usage by up to 30%. At the same time, eco-friendly dishwashers, often with “quick wash” or “eco-cycle” modes, use just a few gallons per cycle compared to handwashing. Routine habits, such as fixing leaks promptly and scraping plates before loading them in the dishwasher, help conserve water and extend appliance life by reducing mineral buildup and clogs.
- Switch to aerated faucets for substantial water savings without sacrificing pressure.
- Invest in dishwashers with water-conservation settings for maximum efficiency.
- Rinse only when required, and be attentive to leak repairs for sustainability.
Waste Reduction in the Renovation Process
Traditional renovations can fill dumpsters with wood, plaster, tile, old appliances, and more, much of which could be reused or recycled. Pre-planning to donate reusable items to charity, salvage old hardware, or recycle raw materials minimizes landfill impact. In some cases, partners specializing in building material recycling can help homeowners sort debris, ensuring that metals, glass, and even certain plastics are properly diverted. The EPA states that roughly half of the solid waste produced in the U.S. comes from construction and demolition. By making waste sorting and recycling a key priority from the outset, functional products can be given a second life, environmental harm reduced, and sometimes disposal costs saved. Responsible renovations today help establish best practices for communities everywhere.
Designing for Better Air Quality
Indoor air quality is crucial to a healthy kitchen, especially after renovations when new materials may off-gas chemicals. Selecting finishes, paints, and sealants labeled as low- or zero-VOC reduces hazardous organic compounds in the air that may irritate allergies or other respiratory issues. Proper kitchen ventilation—like high-quality range hoods that eject cooking fumes outdoors—prevents smoke, moisture, and microbial buildup from cooking or cleaning.
- Choose interior products verified as low-emission for peace of mind.
- Install exhaust hoods over cooking surfaces for adequate odor and steam removal.
- Add spider plants or peace lilies for gentle, natural air filtration.
Key Considerations for Your Renovation Plan
Eco-friendly kitchen makeovers don’t demand a full gut remodel from the start. Begin with an honest assessment: Is your most significant concern inefficient lighting, wasteful water fixtures, or cabinetry made with toxic glues? Prioritizing a few impactful upgrades—like smart, certified appliances or sustainable surfaces—can set you on your way. Many cities and utility companies now offer rebates or incentives for going green, which can help offset upfront costs and kickstart your kitchen’s transformation.
- Identify the kitchen features that use the most energy or create unnecessary waste.
- Research available rebates, tax incentives, or government grants for green upgrades.
- Work with designers or contractors experienced in eco-friendly materials and building practices.
- Remember, incremental changes accumulate: replacing a faucet, choosing healthier paints, and installing new lighting all contribute to your sustainability goals.
Choosing sustainable kitchen renovations involves thoughtful planning and wise investments. Minor improvements can have a lasting impact—not just on your family but also on the environment. As awareness grows and more resources become available, making green choices in kitchen design can be a rewarding and accessible journey for homeowners everywhere.
Humidifiers are essential home appliances that can significantly improve indoor air quality by adding moisture to the air. This is particularly beneficial in dry climates or during winter months when indoor heating systems can reduce humidity levels.
While there are various types of durable humidifiers for long-lasting performance available, this article will focus on the general advantages and characteristics of high-quality humidifiers, such as those known for their advanced technology and efficiency, without mentioning specific brands.
Understanding Humidity and Its Importance
Humidity refers to the amount of water vapor present in the air. Maintaining an optimal humidity level indoors is crucial for health and comfort. The ideal indoor humidity level is typically between 30% and 50%. Levels below this range can lead to dry skin, irritated nasal passages, and respiratory issues, while levels above can promote mold growth and dust mites.
How Humidifiers Benefit Respiratory Health
Humidifiers can have a profound impact on respiratory health. Here are some of the key benefits:
- Alleviating Respiratory Symptoms: Dry air can exacerbate respiratory conditions such as asthma, bronchitis, and sinusitis. By adding moisture to the air, humidifiers can help soothe irritated airways and reduce symptoms like coughing and congestion.
- Preventing Dryness: Dry air can dry out mucous membranes in the nose and throat, making individuals more susceptible to infections. Humidifiers help maintain these membranes’ natural moisture, providing a first line of defense against pathogens.
- Improving Sleep Quality: Dry air can lead to snoring and disrupted sleep. By keeping the air moist, humidifiers can help reduce snoring and improve overall sleep quality.
Characteristics of High-Quality Humidifiers
When considering a humidifier, certain characteristics can enhance its effectiveness and user experience:
- Advanced Humidity Control: High-quality humidifiers often come with built-in hygrometers that automatically adjust the humidity level to the optimal range. This ensures consistent and comfortable air quality without the need for manual adjustments.
- Quiet Operation: Many modern humidifiers are designed to operate quietly, making them ideal for use in bedrooms or nurseries without disturbing sleep.
- Easy Maintenance: Features such as easy-to-clean tanks and filters can make maintenance hassle-free, ensuring the humidifier remains hygienic and efficient.
- Energy Efficiency: Energy-efficient humidifiers consume less power, reducing electricity bills while maintaining optimal performance.
- Safety Features: Automatic shut-off when the water level is low or when the desired humidity level is reached ensures safe operation, preventing potential overheating or electrical issues.
Considerations for Use
While humidifiers offer numerous health benefits, it’s important to use them correctly:
- Regular Cleaning: To prevent the growth of mold and bacteria, clean the humidifier regularly according to the manufacturer’s instructions.
- Use Distilled Water: Using distilled or demineralized water can prevent mineral buildup inside the humidifier, ensuring it functions efficiently and emits cleaner mist.
- Monitor Humidity Levels: Over-humidification can lead to mold growth and increased dust mites. Use a hygrometer to monitor and maintain appropriate humidity levels.
Crafting the Perfect Breath With Your Humidifier
Incorporating a humidifier into your home can significantly enhance respiratory health by maintaining optimal humidity levels. For additional household devices that can work wonders for your living quarters, you should also consider high-performance air purifiers from Dyson. These appliances offer relief from dry air, improve sleep quality, and support overall well-being.
By choosing a humidifier with advanced features and maintaining it properly, you can create a healthier indoor environment that supports easy breathing and comfort.
As you explore options, consider the characteristics that align with your needs to make the most of this valuable home appliance.
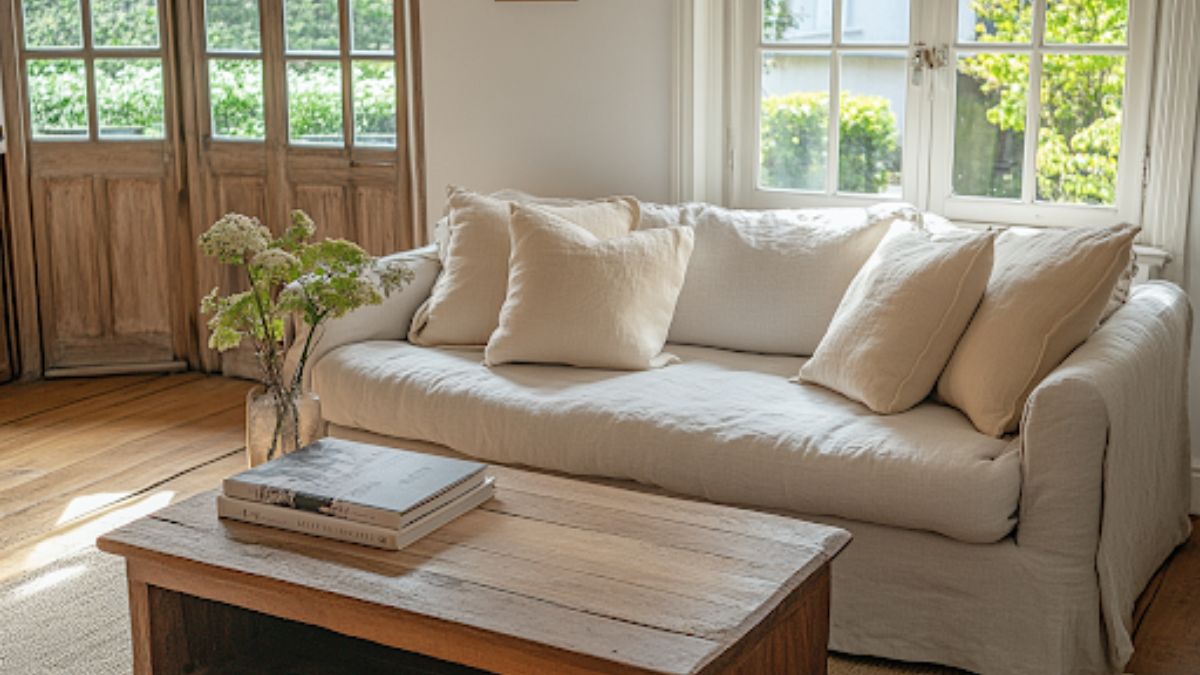
Introduction to Semi-Custom Furniture: What Sets It Apart?
Furnishing your living space is about creating an environment that feels genuinely your own. While some gravitate toward ready-made pieces for ease, and others lean into the exclusivity of fully bespoke furniture, more homeowners are turning to semi-custom furniture collections as a practical yet personal option. Semi-custom designs remove the paralysis that can accompany endless choices and lengthy wait times while still giving you a meaningful role in shaping the final product’s look and feel.
With custom upholstered furniture Toronto selections as an example, individuals can choose from a thoughtfully curated collection and still personalize sizes, colors, and materials. This flexibility is especially welcome for those with busy lifestyles who want beautiful, lasting pieces without the stress of designing everything from scratch. Instead of simply purchasing what everyone else has, buyers can incorporate details that match their preferences and practical requirements, ensuring the furniture not only looks right but also fits their daily routines. The growing affection for this approach signals a shift in how homeowners want to interact with their spaces, seeking both individuality and convenience simultaneously.
The Growing Appeal Of Personalization
Home is where your story unfolds, so it’s no surprise that the desire for personalization has become a strong force in modern furniture design. Gone are the days of settling for mass-produced items that only partially suit your sense of style. People crave the ability to handpick elements such as fabric types, wood stains, and hardware finishes, allowing them to curate interiors that mirror their personalities and lifestyles.
Industry observations and evolving furniture trends reflect this transition. For example, Architectural Digest’s exploration of 2024’s emerging design elements highlights a surge in demand for semi-custom furnishings—pieces that offer enough variety to feel unique without being overwhelming. Open floor plans are more common than ever, and people want the freedom to define their space through creative choices. By controlling colors, proportions, or even the type of stitching, they can address everything from layout challenges to bold, artistic statements in one coordinated collection.
Balancing Cost, Time, And Style With Semi-Custom Solutions
One of the most attractive features of semi-custom furniture is its ability to offer a wide range of benefits while maintaining balance. A fully custom piece can incur substantial expenses and lead times, which may not always be realistic for families with deadlines or modest budgets. Semi-custom options strike a balance, offering the essence of customization at a more affordable price and with a faster turnaround.
Rather than getting bogged down in thousands of design details, shoppers can select from showcase pieces presented in sample rooms or online galleries. Adjusting elements like arm shapes, cushion density, or fabric palette transforms the piece without adding months to delivery schedules. This approach enables homeowners to visualize their space before committing, thereby minimizing the risk of regretful purchases. For designers and clients alike, semi-customization offers creativity without chaos and efficiency without sacrificing the finished look.
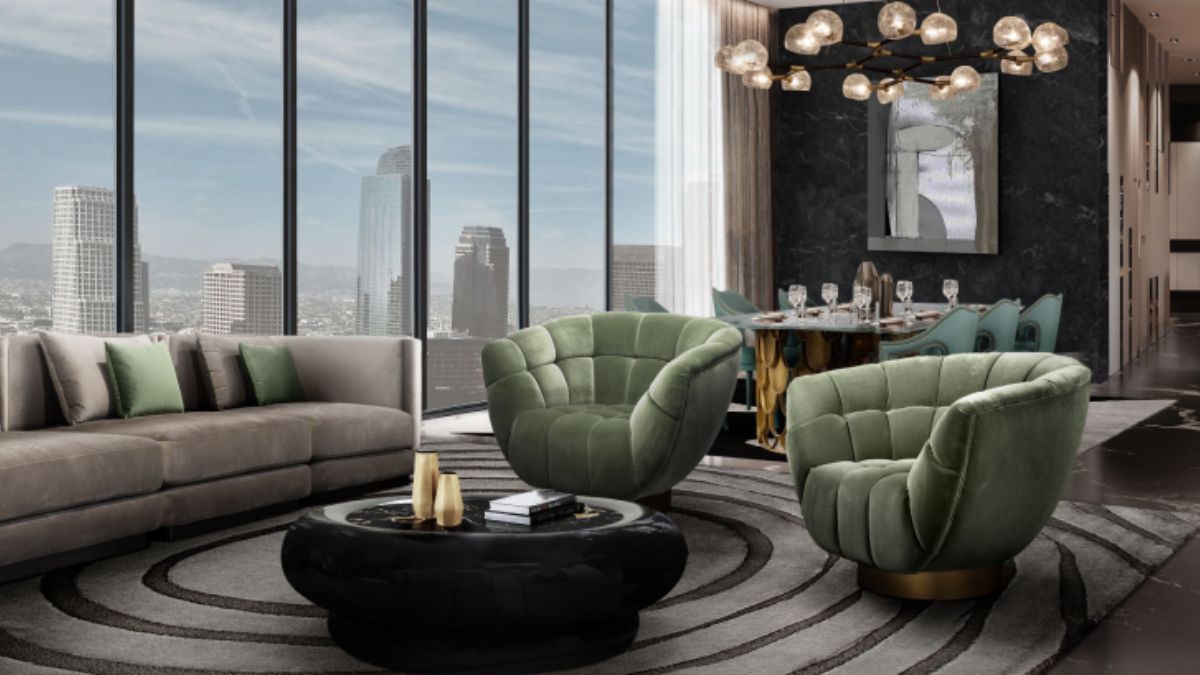
How Semi-Custom Collections Influence Modern Interior Design
As interior design trends move increasingly towards adaptability, semi-custom collections have become invaluable tools for designers and homeowners. Think about modular sofas (once a novelty, now a staple) in small apartments, sprawling family rooms, or working spaces. These adaptable systems break away from the limitations of one-size-fits-all, allowing for the configuration of furniture around unique floor plans or the creation of rooms that transform throughout the day.
Beyond modular seating, other semi-custom lines offer flexible dining tables with adjustable tabletops, sideboards featuring a variety of hardware options, and beds available in a range of wood tones or headboard styles. With interchangeable features, people can refresh their homes as styles or personal needs evolve, rather than swapping out entire collections. By marrying core design principles with customizable aspects, semi-custom furniture empowers everyone to become the designer of their living environment.
Sustainability And Longevity In Furniture Choices
Sustainability isn’t just an optional upgrade; for today’s buyer, it’s a criterion as important as comfort or color. Semi-custom furniture collections cater to this value, frequently offering certified wood, recycled content, low-VOC finishes, and ethically sourced materials. Many semi-custom manufacturers also prioritize regional production, which reduces the energy spent on transporting finished goods and supports the local workforce.
According to the Forbes Business Council, prioritizing sustainable practices is not just good for the planet but also preserves consumer trust and aligns with market preferences. In practical terms, furniture designed to last—for example, a customizable sectional with replaceable fabric covers or a dining table with solid joinery—results in fewer purchases and less waste. Sustainability thus becomes a built-in advantage of the semi-custom approach, delivering both peace of mind and reliable performance over the years of daily life.
Functionality Meets Aesthetics: Flexible Living For Every Lifestyle
Few interiors are static these days. They’re playrooms, offices, entertainment hubs, and sanctuaries—sometimes all within a single day. Recognizing this, semi-custom furniture designers incorporate features that respond to these multipurpose demands. Consider the impact of ottomans with hidden storage, sofas that convert into guest beds, or adjustable shelving that expands as your book or record collection grows.
For families with kids or pets, options like stain-resistant fabrics or removable slipcovers are lifesavers, marrying functionality with stylish design. Urban professionals working from home may opt for desks or modular seating designed for small-space living without compromising on sophistication. The beauty of semi-custom furniture lies in its ability to adapt gracefully, ensuring each piece is as hardworking and flexible as the lifestyle it serves.
Future Trends: What’s Next for Semi-Custom Collections?
The landscape for semi-custom furniture continues to evolve, propelled by digital advancements and shifting consumer priorities. Technology is making it easier for shoppers to visualize their chosen pieces in their own homes through online configuration tools and augmented reality. These capabilities create confidence and excitement, encouraging more people to personalize their environments.
In the coming years, the expansion of modular features, eco-friendly materials, and smart functionalities will further elevate semi-custom lines. As living and working habits continue to shift, so too will the demands placed on interiors. Expect a surge in collaborative designs between artisans, manufacturers, and everyday users, keeping quality craftsmanship accessible while pushing the boundaries of what’s possible in personalized living. Semi-custom furniture collections are set to remain a vital solution for those seeking originality, value, and resilience in the heart of the home.
-

 TOPIC8 months ago
7 Expert Tips For Choosing The Best Basement Renovation Companies
-

 BUSINESS1 month ago
Top 5 Features of Sowix Online That Every User Should Know About
-

 TOPIC1 day ago
Why Greece Katz Martian Has Everyone Talking in 2025
-

 TOPIC1 month ago
Top Features of BetterThisWorld .com You Need to Know About
-

 FINANCE4 months ago
How TraceLoans Can Simplify Your Finances
-

 BIOGRAPHY4 months ago
From Reality Star to Business Mogul: Prince Narula Digital PayPal
-

 EDUCATION4 weeks ago
The Evolution of Pi123: How It Became a Must-Have Tool
-

 TOPIC1 month ago
Sabsastaa.com: Your Ultimate Guide to Budget Shopping and Savings